Hello Amigurumi Lovers and Beautiful Visitors!
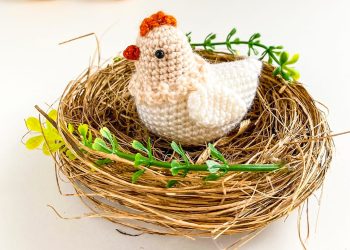
I’m excited to share some free amigurumi models with you! In this post, I will guide you through creating a delightful amigurumi chicken. At the end, you’ll find detailed construction patterns for the model.
Materials Needed
- Yarn: Vita Brillant (45% wool, 55% acrylic, 380 m/100g, fingering weight) in white, beige, and a touch of orange.
- Crochet Hook Size: 1.5 mm
- Eyes Size: 3 mm, plus glue
- Additional Supplies: Polyester fiberfill, sewing needle, scissors, pins.
The size of the chicken is approximately 5 cm.
Abbreviations
- MR: Magic ring
- Ch: Chain
- Sc: Single crochet
- Slst: Slip stitch
- Inc: Increase
- Dec: Decrease
- Dc: Double crochet
Head and Body
Start with beige yarn.
- Rnd 1: 6 sc in MR
- Rnd 2: 6 inc (12)
- Rnd 3: (1 sc, inc) × 6 (18)
- Rnd 4-5: 18 sc (2 rounds)
- Rnd 6: (5 sc, inc) × 3 (21)
- Rnd 7-8: 21 sc (2 rounds)
- Rnd 9: (6 sc, inc) × 3 (24)
Change to white yarn, leaving the white thread in front of your work.
- Rnd 10: Work in back loops only: 24 sc.
- Rnd 11: Make 7 ch, then work along the chain starting from the second stitch from the hook: inc, 5 sc, then continue with 24 sc around, plus 6 sc along the side of the chain (37).
- Place a marker; this will indicate the new round beginning.
- Rnd 12: 2 inc, 16 sc, 2 inc, 16 sc, inc (42)
- Rnd 13: 1 sc, 3 dc (with one top in one stitch), 40 sc (42)
Return to the beige yarn and work in the front loops of the 9th round:
- Rnd 14: (4 ch, skip one stitch, 1 sc in the next stitch) – repeat to the end of the round, finishing with a slst. Cut off the thread and weave in.
Continue with the white part of the chicken.
- Rnd 14-17: 42 sc (4 rounds)
- Rnd 18: 1 sc, dec, 19 sc, dec, 18 sc (40)
- Rnd 19: (dec, 18 sc) × 2 (38)
- Rnd 20: (dec, 17 sc) × 2 (36)
- Rnd 21: (4 sc, dec) × 6 (30)
- Rnd 22: (3 sc, dec) × 6 (24) – stuff the body.
- Rnd 23: 12 dec (12) – stuff to the end.
- Rnd 24: 6 dec
Tighten the stitches with a needle, cut off the thread, and weave in.
Wings (Make 2)
Using white yarn:
- Rnd 1: 6 sc in MR
- Rnd 2: 6 inc (12)
- Rnd 3-5: 12 sc (3 rounds)
- Rnd 6: (4 sc, dec) × 2 (10)
- Rnd 7: (3 sc, dec) × 2 (8)
- Rnd 8: (2 sc, dec) × 2 (6)
Tighten the stitches with a needle, cut off the thread, and leave a tail for sewing. Bring the thread to the middle of the inside part of the wing.
Beak (Orange)
- Rnd 1: 4 sc in MR
- Rnd 2: (1 sc, inc) × 2 (8)
Cut off the thread, leaving a tail for sewing. Do not stuff.
Assembly
- Glue the eyes between the 4th and 5th rounds, with 7 sc between them.
- Sew on the beak between rounds 5 and 6 in the middle.
- Comb: Starting from the back to the beak, insert the hook under a stitch of the second round (closer to the back), attach orange thread, make 3 ch, work 1 sc under the next stitch (already in the first round), make 3 ch, then 1 sc under the next stitch of the first round, 2 ch, and 1 sc under a stitch of the second round. Cut off and secure the thread, then weave in.
- Sew the wings onto the sides of the body, approximately between rounds 7-13 counting from the bottom.
Feel free to tag me (@freeamigurumii) in your photos on Instagram or Facebook if you’d like!


